Search This Blog

Tuesday, November 10, 2015

Vegan Kabocha Squash Pasta Sauce - AIP-Friendly

For the last seven months, I've really missed tomato sauce while on the AIP diet.  I've made a few "nomato" sauces from pureed winter squash, beets and seasonings, but it was just missing that savory, robust taste you get from a tomato sauce.  I found several kabocha squash sauce recipes online, but most of them were filled with heavy cream, cheese and spices I couldn't have.  I decided to try to make something that was vegan and AIP-friendly, and it worked!  I'm happy to say I found a replacement that makes me not miss tomato sauce one bit!  I could have eaten the entire pot of sauce. It smelled wonderful while cooking and was absolutely delicious!  This is my new favorite!  This recipe will serve 4.


  • 1 3-pound kabocha squash 
  • 1 tablespoon avocado oil
  • ⅓ cup chopped onion
  • ½ cup nutritional yeast
  • ½ cup full-fat coconut milk (I recommend Natural Value, as it has no additives)
  • ⅛ teaspoon mace
  • 1 tablespoon dried parsley
  • 1 teaspoon garlic powder
  • 2 teaspoons of lemon juice, plus more to taste
  • 1-2 tablespoons ume plum vinegar
  • Sea salt
  • Freshly ground black pepper (omit for AIP)
  • Vegetable stock or broth, if needed, to thin to desired consistency (make sure to use one that's free of nightshades or use homemade)


  1. Preheat oven to 350°F.  Cut the kabocha squash in half width wise. Scoop out and discard the seeds and stringy pulp. Pour a thin layer of water (about ¼ cup) into a baking dish and place the squash halves cut side down in the water. Bake the squash until it is fork tender (an inserted fork goes in and out with ease, about 45 minutes). Once the squash is cool enough to handle, scoop out the flesh from the skins and transfer to a food processor or blender. Puree until smooth. Discard the skins.
  2. In a medium sauce pan, warm avocado oil over medium heat. Add the onion and sauté until soft (4 – 5 minutes). Stir in the kabocha squash puree and cook for an additional minute. Slowly add the coconut milk into the squash mixture, making sure it is completely incorporated before the next addition. Add the nutritional yeast, mace, garlic and ume plum vinegar, stirring to incorporate. If you want sauce with a thinner consistency, stir in vegetable broth or stock until desired consistency is achieved.  
  3. Remove the sauce from the heat and add parsley and lemon juice. Taste your sauce and season with salt, pepper and additional lemon juice if needed. 
  4. Serve on spiralized vegetable noodles, cooked veggies, cooked sweet potato starch noodles (Korean glass noodles) or anything else you please!

Vegan Plantain Pancakes - AIP-Friendly

Since I've been doing the AIP diet for about seven months now, I've been craving pancakes. I used to make some decent gluten-free ones back in the day, but that was no longer an option after cutting out all grains. I had seen some interesting pancake recipes using plantains, but every single one either had eggs or gelatin in them, which is neither AIP nor vegan!

I decided to take matters into my own hands and do some experimenting yesterday morning. I was very pleased with the outcome, and would definitely make these again. They weren't too flat, and they were not rubbery, as I've heard some plantain pancakes can be when made with gelatin.  They have a slight banana taste to them.  If you don't like or don't have bananas, you could replace it with an equal amount of applesauce.

  • 2 large green green plantains, chopped
  • 3/4 cup cup organic full fat coconut milk (I suggest the Natural Value brand, as it doesn't have any additives ) 
  • 1/4 cup coconut oil, melted
  • 1 ripe banana, mashed (around 1/3 cup)
  • 1 tsp homemade vanilla extract (omit for AIP)
  • 1/2 rounded tablespoon of homemade egg replacer powder mixed with 3 tablespoons water
  • 1/4 cup coconut flour
  • 1/2 tsp baking soda 
  • 1/2 tsp ground cinnamon
  • pinch sea salt 
  • 1 tablespoon apple cider vinegar

  1. Place the chopped plantains and coconut milk into your food processor or blender and blend until smooth.  Next, add the banana, melted coconut oil, vanilla and baking soda and blend again. 
  2. Transfer the blended ingredients to a large bowl and add the remaining ingredients.  Stir well to combine.
  3. Oil your griddle or frying pan with coconut oil or coconut spray and heat on medium.
  4. Using a 1/4-1/3 cup measure, scoop the batter into the pan or griddle to form pancakes (you may need to jiggle the pan to get them to flatten out a bit).
  5. Cook the pancakes for 3-4 minutes per side, until completely cooked through.
  6. Serve and enjoy with maple syrup, chopped banana, berries or other favorites!
Recipe yields about 10 pancakes, depending upon size

Mini Vegan Pumpkin Pie Cups - AIP-Friendly

It seems like most every fall and winter, I need to become a mad scientist and figure out a new work-around recipe for an old seasonal favorite food.  The latest experiment for me was how to make a pumpkin pie AIP-friendly.  By omitting the crust, that makes things much easier (and cuts down on the calories!), but the filling still needed some adjustments.  I always struggle with what to do about egg replacements.  I recently made a homemade powdered egg replacer that has worked very well in several recipes, and this was another success story!

For this particular recipe, I made mini pies in coffee mugs.  If you're using smaller ramekins, you could make 8 servings.  For larger mugs, this makes 4 larger servings.  Without the crust, the 4 larger servings seemed like the right size.

The consistency of this comes out like a cross between a pudding and a mousse.  It sets up, but it's not as firm as a baked pie would be.  However, I found the light consistency to be much nicer, and all my guests who ate it agreed.

Anyone who tries this would find it impossible to believe this is free from gluten, egg, dairy, corn, grains and nuts!  If you like pumpkin pie, you'll love this.  And no oven is required!  Serving is also a breeze, with everything pre-portioned into cups.


Prep Time: 2 hours, 15 minutes
Yield: 4-8 mini pies, depending on size of cup or ramekin

  • 1 13.5 oz can full-fat coconut milk (about 1.5 cups) - I recommend Natural Value, as it does not have any additives 
  • 1 15 oz can pumpkin puree (about 1.5 cups) - if you have homemade pumpkin, even better!
  • 1/2 cup maple syrup
  • 1 heaping tbsp homemade powdered egg substitute mixed in 4 tablespoons water
  • 1 tsp homemade vanilla extract (omit on AIP)
  • 1/4 tsp sea salt
  • 2 tsp cinnamon
  • 1/4 tsp ginger
  • 1/4 tsp mace
  • 1/8 tsp cloves

INSTRUCTIONS
  1. Combine all ingredients above into a small saucepan. Stir on low heat for about 5 minutes, until all combined and heated through.
  2. Pour into small mugs or ramekins.  I used a ladle to make portioning out easier.
  3. Set in the refrigerator for at least 2 hours or overnight if preparing ahead of time. 
  4. Enjoy!

Vegan Egg Replacer Substitute Powder - AIP-Friendly

One of the most difficult things to substitute in both an AIP and vegan diet are eggs.  They are an important part of many recipes to bind ingredients together, help them rise or thicken.  I was using chia and flax seeds for a while, before I had to cut out seeds.  Store-bought egg replacers were also no longer an option due to the cornstarch and potato starch.  I had to find something!  I found a homemade egg replacer recipe online, but it still wasn't AIP, so I decided to try to make it work with some modifications.  I'm happy to say, it's worked in making flatbread, breadsticks, pumpkin pie, and a few other items.

The ingredient list is fairly simple:

Instructions:
  1. Combine all ingredients in a bowl.  
  2. Store in an airtight container with a label with the following measurement instructions:
  • 1 large egg = 1/2 rounded tablespoon egg replacer and 2 tablespoons water
  • 1 egg yolk = 1/2 rounded tablespoon egg replacer and 1 tablespoon water
Notes:
  • I store my egg replacer in a Mason jar with a screw-on plastic lid with the instructions written on a piece of masking tape on the side.
  • If you don't have a half tablespoon measuring spoon, use a rounded 1.5 teaspoons.
  • This recipe works best for recipes that are not egg-heavy.  This would not work for a quiche, meringue or something along those lines!
  • Make sure to put items into the oven right away when using this egg replacer.  The recipe looses its oomph if you wait too long.  
  • I've also found that having a bit of lemon juice or apple cider vinegar in the recipe helps it to rise more with this egg substitute.
  • This recipe replaces 45-50 eggs

Corn-Free Baking Powder - AIP-Friendly

One of the first things I was most shocked that contained corn was baking powder.  I couldn't understand why it contained corn.  Now, I ask myself that question about 10 times a day about many different things, so it's the norm, unfortunately!

After doing some Google searching, I found making your own baking powder is quite easy.  You just need three ingredients, and you'll be all set.  In fact, if you're on AIP or a paleo diet, or avoiding corn or grains, you probably already have these ingredients handy!

This homemade baking powder can be used 1:1 as you would store-bought.  This recipe will make one cup of baking soda.  If you're going to also make homemade egg replacer, I suggest at least doubling this recipe, so you'll have enough.


Directions:
  1. Combine ingredients with a whisk and mix well.
  2. Store in a tightly closed container (labeled, so you know what it is!) to prevent activation of the ingredients from moisture.

Sunday, November 8, 2015

Vegan Squash or Pumpkin Soup - AIP-Friendly

One of my favorite soups is pumpkin or winter squash soup.  It's not only delicious, but it's very festive and great for the holidays or get-togethers with friends and family.  While on the AIP diet, I had to make some changes to the spices I use for cooking, and this recipe is no exception.  I find that this particular recipe is more tasty than previous versions I made using dairy or other alternative milks, such as almond.  As with any soup recipe, it always tastes better the next day, so I make it a day ahead of serving.

This recipe is very versatile, and you can use pumpkin, butternut or kabocha squash with equally-delicious results!  This recipe makes about 4-6 servings, depending on the size of your bowls and appetite.


INGREDIENTS

  • 1 4-pound pie pumpkin, butternut or kabocha squash, or a 29 oz can of pumpkin
  • 3 tablespoons avocado oil
  • 1 large yellow onion, chopped
  • 4 large or 6 medium garlic cloves, pressed or minced
  • ½ teaspoon sea salt
  • ½ teaspoon ground cinnamon
  • ½ teaspoon ground mace
  • ⅛ teaspoon cloves
  • Freshly ground black pepper (omit on AIP)
  • 4 cups vegetable stock (homemade or nightshade-free)
  • ½ cup full fat coconut milk (homemade or the Natural Value brand, which has no additives)
  • 1 tablespoon maple syrup


INSTRUCTIONS

  1. Preheat oven to 425 degrees Fahrenheit.  Carefully halve the squash or pumpkin and scoop out the seeds.
  2. Place the squash cut sides down onto the baking sheet, and add about 1/4 of water to pan. Cover with foil.  Roast for 35-40 minutes, until the flesh is easily pierced through with a fork. Set squash aside to cool slightly.  If you're using canned pumpkin puree, skip steps 1-2 and move right onto step 3.
  3. Heat 3 tablespoons avocado oil in a large Dutch oven or heavy-bottomed pot over medium heat. Once the oil is shimmering, add onion, garlic and salt to the skillet. Stir to combine.
  4. Cook, stirring occasionally, until onion is translucent, about 8 to 10 minutes. In the meantime, peel the skin off the squash and discard. Add the cinnamon, mace, cloves and a few twists of freshly ground black pepper to the pot, followed by the squash flesh.  Pour in the broth. Bring the mixture to a boil, then reduce heat and simmer for about 15, to give the flavors time to blend.
  5. Once the squash mixture is done cooking, stir in the coconut milk and maple syrup. Remove the soup from heat and let it cool slightly. You can use an immersion blender to blend this soup in the pot, or transfer it to blender for a smoother consistency.  Working in batches, transfer the contents pan to a blender to blend and be careful not to burn yourself with the steam (don't try to do this with extremely hot soup, or your blender may explode!). 
  6. Ladle soup into individual bowls and season to taste.

Sunday, July 5, 2015

Curried Summer Squash Soup - AIP/Paleo-Friendly


This morning, there were a few huge summer squash in our garden.  They were perfect soup squash, and I had enough to make a double-batch!  I found an old cookbook with lots of squash recipes, and modified it to my new AIP Paleo dietary restrictions.  The recipe below is for a single batch of soup.

Curried Summer Squash Soup
Serves 4-6

  • 4 Tbsp coconut oil
  • 1 medium onion, thinly sliced
  • 4 tsp of AIP-friendly curry spice mix
  • 4 cups of veggie stock or chicken bone broth (homemade or nightshade free)
  • 4 cups of summer squash (about 1.5 lbs)
  • 2 tablespoons coconut butter (aka coconut cream concentrate or coconut cream)
  • Himalayan salt to taste
Directions:
  1. Heat oil in a skillet over medium heat.  Add the onion and saute for 10 minutes, or until golden brown.  
  2. Stir in the curry spice mix and cook for one minute more.  
  3. Stir in the broth, add the squash and bring to a boil.
  4. Reduce heat to low and cook for 10 more minutes, until squash is soft.
  5. Puree using either an immersion blender or in batches in a traditional blender.
  6. Add salt to taste and enjoy!

Curried Carrot Soup - AIP/Paleo-Friendly

I had tons of carrots in my crisper drawer a few weekends ago.  I didn't want them to go bad, but I wasn't sure what to do with all these carrots.  I saw a carrot soup recipe from the Paleo Mom in my Facebook feed, so I decided to make it, with some modifications of my own.  This is my new favorite soup!

Ingredients:
  • 6 cups broth (veggie stock or chicken bone broth)
  • ¼ medium onion, finely chopped
  • 1 lb carrots, roughly chopped
  • 1 sliced baked sweet potato, skin removed
  • 1 tsp fresh ginger, finely grated
  • 1 tsp AIP-friendly curry spice mix (click for spice recipe)
  • 2 Tbsp coconut butter (aka creamed coconut or coconut cream concentrate, depending upon the brand)
  • Himalayan salt to taste

1. Bring broth to a rolling simmer over medium high heat. Add onion, carrots and sweet potato and let simmer until carrots are extremely soft, about 35-40 minutes.
2. Add ginger and curry mix and let cook another 5 minutes
3. Blend soup with an immersion blender until smooth.  You can also use a regular blender, being very careful not to explode the hot contents (I've done this before!) and pureeing in a few small batches.
4. Add coconut butter and salt and stir to combine

AIP Paleo-Safe Seedless Curry Spice Mix

One of the biggest challenges for me with the AIP (autoimmune protocol) Paleo diet is figuring out which seasonings and additives I can use to flavor recipes.  Now that most seed-based and nightshade-based spices are out, I've really had to amp up my substitutions!

Recently, I've made two vegetable soups that called for curry powder, which is a no-go with seed and nightshade ingredients.  I knew the soups would be too bland without the required seasonings, so I did some searching and found a seedless curry seasoning mix.  I decided to make enough to fill an empty spice jar, so I'd have enough for future recipes.

AIP Paleo-Safe Curry

In a medium bowl, combine the following:


2 Tbsp Granulated Garlic
2 Tbsp Granulated Onion
2 Tbsp Turmeric
1 Tbsp and 1 tsp dried Basil
1 Tbsp and 1 tsp dried Dill Weed
1 Tbsp and 1 tsp Cinnamon
2 tsp black pepper (only if you've confirmed it's safe for you)
2 tsp powdered Ginger
1 tsp ground Cloves

Mix together and pour into storage container.  I used a funnel to prevent everything from spilling all over the place.  I keep empty glass spice bottles on-hand to store my own spice mixes.  Just make sure to label the bottles, so you know what's what!  Use this in place of any recipe that calls for curry powder.  Enjoy!

Cauliflower Rice Pumpkin Risotto - AIP/Paleo-Friendly

Before I moved into the Autoimmune Protocol (AIP) Paleo diet, I used to eat a lot of rice.  At least a 1-2 days per week, I'd have rice with a stir fry, as a risotto, in soups, or mixed with vegetables.

Now that I'm completely grain-free, it requires a bit more experimentation and creativeness.  I heard about making "rice" out of cauliflower, and using that as a replacement to make modified rice dishes.  I finally gave it a whirl last weekend.

Inspired by my new cauliflower rice, I tried to find a risotto recipe that could work with AIP ingredients. I found a few cauliflower risotto dishes, but many had forbidden ingredients.  I decided to experiment with a new twist on a pumpkin risotto recipe:

Cauliflower Rice Pumpkin Risotto


  • 1 Tbsp coconut oil
  • 1 medium onion, diced
  • 1 head of cauliflower, riced in a food processor
  • 1/2 cup stock (veggie stock or bone stock)
  • 2 tsp ume plum vinegar
  • 2 tsp garlic powder
  • 1 tsp ground mace
  • 1/2 tsp black pepper (omit for AIP diet)
  • Himalayan salt to taste 
  • 1 3/4 cup pumpkin puree (you could also use butternut squash puree)
  • 2/3 cup coconut milk (I recommend the Natural Value brand, as it does not have any additives)


Directions:

  1. Roughly chop one head of cauliflower and pulse in a food process until rice-sized.  This will probably require two batches in a large food processor.  Don't over process the cauliflower.  There will be a few larger-sized pieces remaining.
  2. Cook the onion in the coconut oil in a large pan until soft and translucent.
  3. Add the cauliflower, stock, vinegar, garlic, pepper, salt and mace to the pan and simmer for 10 minutes, until most of liquid is cooked off.
  4. Add the pumpkin puree and coconut milk and simmer for 5 more minutes, until it is thickened.
  5. Serve and enjoy!


Sunday, May 10, 2015

Corn-Free, Gluten-Free Blueberry Muffins

We were fortunate this year to have several special guests at our house for Mother's Day - my mom, my dad, my husband's mom and my husband's aunt.  We had a lovely day with everyone, with guests at the house for both brunch, and then later towards dinner time.

As I did the last few years, I made a nice, big brunch for our guests.  Because I've had to modify my diet so much recently with my newly-discovered corn intolerance (among many other things), I was somewhat nervous about what to make that would be tasty to other people.  I spent several days, trying to plan out a menu, and research options for baking that were gluten, corn, dairy and nightshade-free.

I was quite pleased with the outcome of everything I made, including modification to my crustless quiche, which I made without the cheese.  One of the menu items was a complete experiment (not advisable when cooking for guests, but I like to live on the edge with my cooking!), and it ended up being a favorite.

Since I've recently started making my own almond milk, I had some leftover almond meal pulp that I wanted to use, which was the foundation of this recipe.  I didn't want the muffins to be like bricks, so I added some tapioca and gluten-free oats to the mix, and it worked out well.  Below is my new favorite blueberry muffin recipe, which I will definitely be making again!  They were moist and full of blueberries.  My oven tends to bake a bit slower, so keep an eye on them when you get over 22 minutes or so, just to make sure they're not over-cooking.

Blueberry Muffins

  • 1 cup blueberries (I used frozen)
  • 1/4 cup coconut oil
  • 1/2 cup honey
  • 1 cup wet almond pulp (leftover from making almond milk)
  • 1 TBSP chia seeds
  • 1 cup tapioca flour
  • 1 cup gluten-free oats (Bob's Red Mill)
  • 1 tsp xanthan gum (Authentic Foods is the only brand I know that's corn-free)
  • 1 tsp baking soda
  • 1/4 tsp sea salt
  • 2 eggs
  • 1 tsp vanilla extract (homemade only with Ciroc vodka to avoid corn)
  • 3/4 cup homemade almond milk
  • 2 tsp apple cider vinegar - DO NOT add until very last (only use apple cider vinegar, as white vinegar is distilled from corn)
  • 1 TBSP Sucanat sugar
1. Preheat the oven to 400F. Grease a 12 cup muffin tin.

2. In a large bowl, mix together the chia seeds, tapioca flour, baking soda, xanthan gum and sea salt.

3. In a pot, over medium heat, add in the honey and coconut oil. Melt the oil and honey together. Once melted, turn the heat off.

4. I decided to make this a blender batter with my VitaMix, to help puree up the oatmeal (option A).   If you don't have a VitaMix, I don't recommend this method, or you'll kill your blender!  If you don't have a VitaMix or don't want your oatmeal ground up, follow option B.    

Option 4A (with VitaMix): Add the eggs, milk, and vanilla extract to VitaMix. DO NOT add the vinegar yet. Add wet almond pulp to the blender. Add the honey/oil mixture.  Finally, add the oatmeal.  Run blender on low for about a minute, until it looks well-blended. Once blended, pour out the batter into the large bowl with the other dry ingredients and stir until combined.

Option 4B (If you don't have a VitaMix or don't want the oatmeal ground up): In another bowl crack in the eggs, milk, vanilla extract and wet almond pulp. DO NOT add the vinegar yet. Add in the honey/oil mixture, a little bit at a time, while constantly stirring so the eggs don’t curdle. Add the wet to the dry ingredients and stir until combined.

5. Add in the blueberries, stir. Add in the vinegar, stir. Immediately scoop batter into the muffin tin (I used a large cookie scoop), sprinkle the tops of the muffins with the sucanat and get into the oven as quickly as possible. The vinegar helps the muffins rise as soon as the vinegar is added to the batter.

6. Bake for 25-27 minutes until golden brown and a toothpick comes out clean.

Monday, April 6, 2015

Cleaning Up My Cleaning Routine

For years, I've tried to use the "greenest" cleaning products available, staying away from nasty chemicals.  I've found that if something makes the skin peel off my hands, it's probably not something we should be using around the house.

About 13 years ago, I became a big fan of Method cleaning products.  At the time, they were one of the few "green" cleaning products on the market, and they had such nifty packaging and marketing that drew me to become a huge advocate of their products.  I've also always been a fan of Seventh Generation products for years, since they're based out of Burlington, VT, my home town!

Fast forward to 2015, when I became a bit skeptical of Method's "green" claims.  On Sunday, while everyone was having their Easter fun, I spent several hours, knee deep in the Environmental Working Group's Cleaners database.  My quest was to to find the best-rated products I could for each task in our home.

Good news - several of the Seventh Generation products I use were all rated as an A or B by EWG.  Bad news - all but one product from Method rated lower than a B.  This sadly proved that I've been greenwashed for years by Method!  So disappointing!  But thank goodness for references like EWG to become more informed.

Now, I know that the best cleaning products are those you make yourself, and I do still make some of my own cleaners that I use for my own purposes around the house.  However, our cleaning people get confused by such non-labeled, multi-use products, that it becomes a chore in itself to try to explain what's what and that the spray bottle of vinegar is for cleaning!  Several of the items I researched are also things I would not even know how to make (nor have time), such as laundry detergent or dishwasher detergent.

If you're on a similar quest to find the healthiest cleaning products for your home, I've compiled a list of the best-rated products readily available online, and where I purchased them for the cheapest price.  I compared Drugstore.com, VitaCost.com and Soap.com.  In general, Soap.com's prices were double that of Drugstore.com and VitaCost.com, so I stopped looking at their site after the first few products!  In some cases, the prices between VitaCost and Drugstore were close, but a limited-time promo on one site or the other made one site a better deal today over the other.


All Purpose Cleaner
  • Sun & Earth All Purpose Cleaner, Light Citrus (only available at VitaCost)
Bathroom
  • Seventh Generation Toilet Bowl Cleaner - Emerald Cypress and Fir (Check between Drugstore.com and VitaCost, depending on promos)
  • Seventh Generation Natural Tub & Tile Cleaner - Emerald Cypress and Fir (Check between Drugstore.com and VitaCost, depending on promos)
Dishes
  • Seventh Generation Automatic Dishwasher Detergent Concentrated Pacs (45 count package) - Free & Clear (Drugstore.com only has the larger size package)
  • Sun & Earth Hypoallergenic Dishwashing Liquid - Light Citrus Scent (only available at VitaCost)
  • Ecover Natural Rinse Aid for Dishwashers (VitaCost)
Glass Cleaner (a nice-to-have when I don't have time to make myself)
  • Sun & Earth Glass Cleaner (only available at VitaCost)
Laundry
  • Biokleen Chlorine Free Oxygen Bleach Plus Powder (Check between Drugstore.com and VitaCost, depending on promos)
  • Ecover Non-Chlorine Bleach Ultra (VitaCost)
  • Ecover Stain Remover (VitaCost)
  • Biokleen Laundry Liquid (Check between Drugstore.com and VitaCost, depending on promos)
  • Seventh Generation Natural Fabric Softener Sheets - Blue Eucalyptus and Lavender (Check between Drugstore.com and VitaCost, depending on promos)
  • Ecover Natural Fabric Softener - Morning Fresh (this was the only liquid fabric softener I could find with a rating of B - all other scents are Cs or lower. This specific scent is only available at VitaCost)
Wood Cleaner
  • Method Wood for Good Daily Clean Almond (VitaCost)
Things I make myself

I hope this list is helpful to you!  I know I'm going to keep it handy for my next reorder of products in a few months.  Here's to safe cleaning!

Sunday, January 11, 2015

Successful Gluten-Free Bread!

A sad realization that I haven't posted on my blog in over a year.  I had no idea it had been that long!  Now that I've gotten over the shock of what I've been doing with my life over the last year, I wanted to post a review and version of a recipe for some gluten-free bread I just made that came out as well as regular bread!  I've been gluten-free for almost five years now, and making a loaf of bread seemed like a gamble, since I've heard (and tasted) so many GF bread horror stories!  This success story was a happy surprise for me!

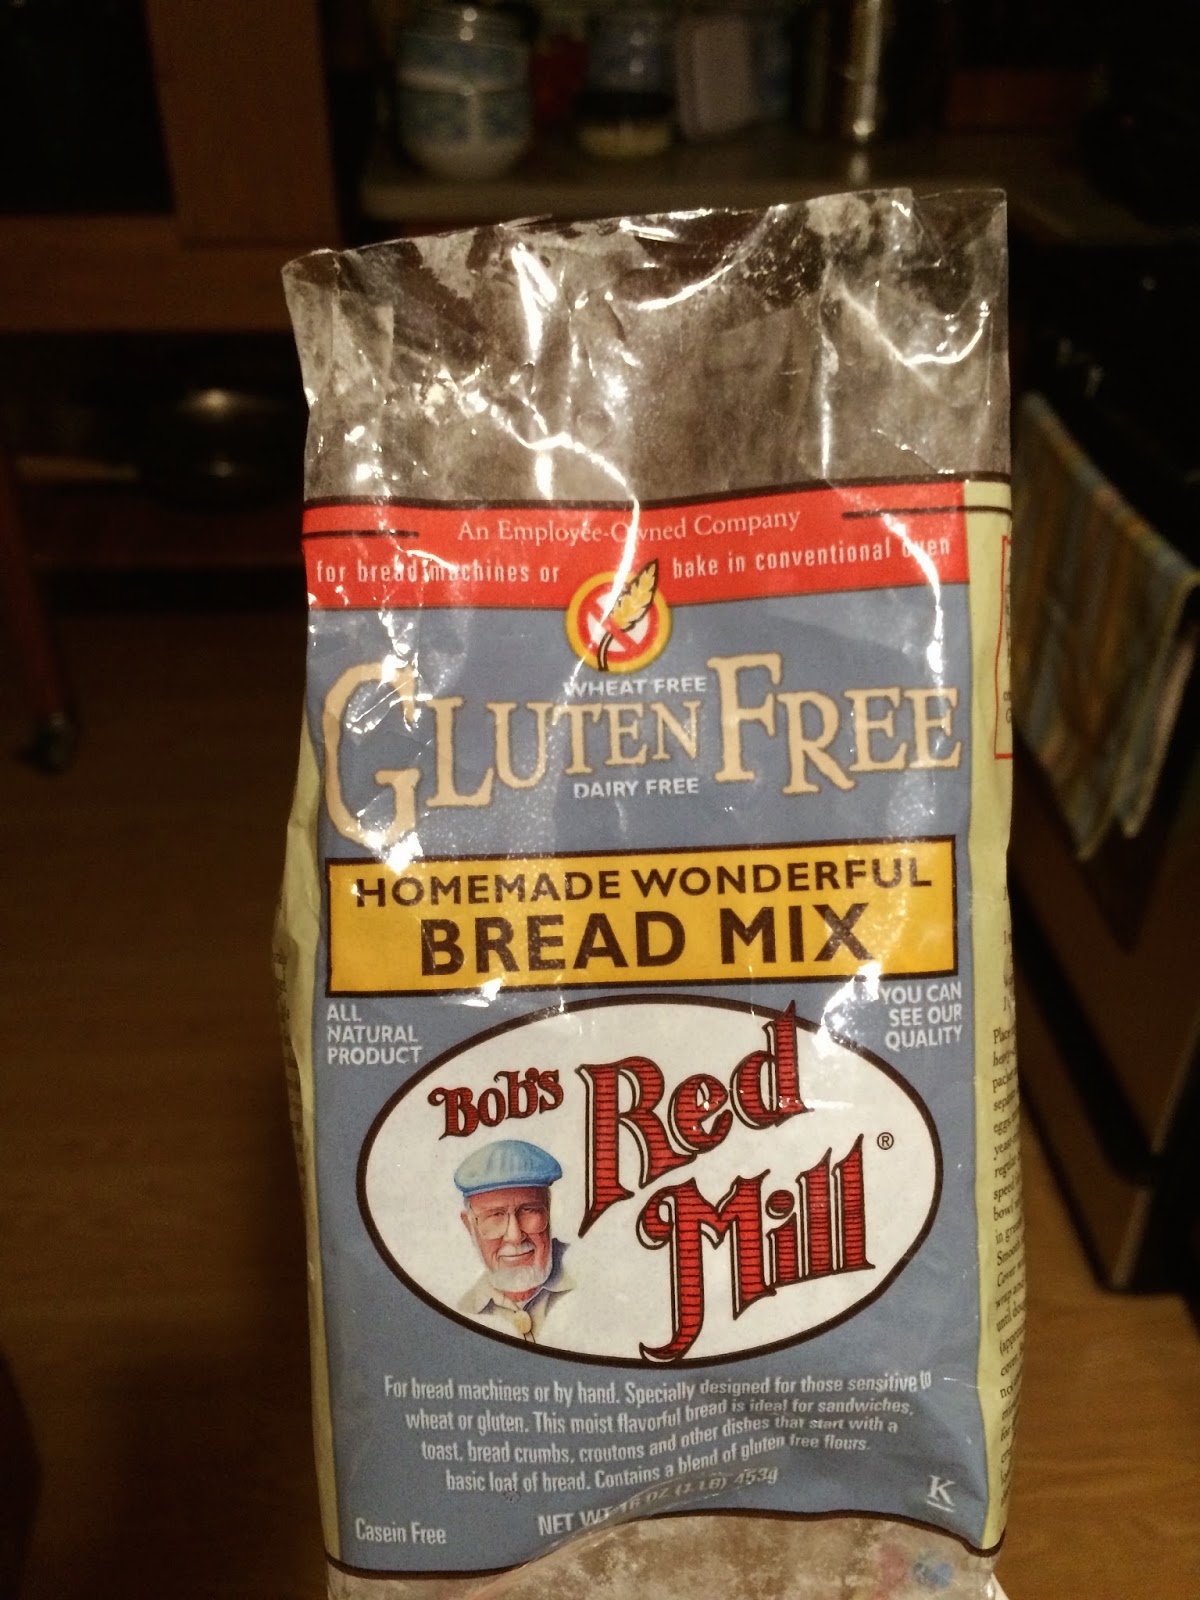
First off, I used a flour mixture from Bob's Red Mill, called Homemade Wonderful Bread Mix.  I have to agree with the name, as it was wonderful!  I can safely say I will be buying more of this flour mixture, as it's a winner!
Now, for what I added to the mix:
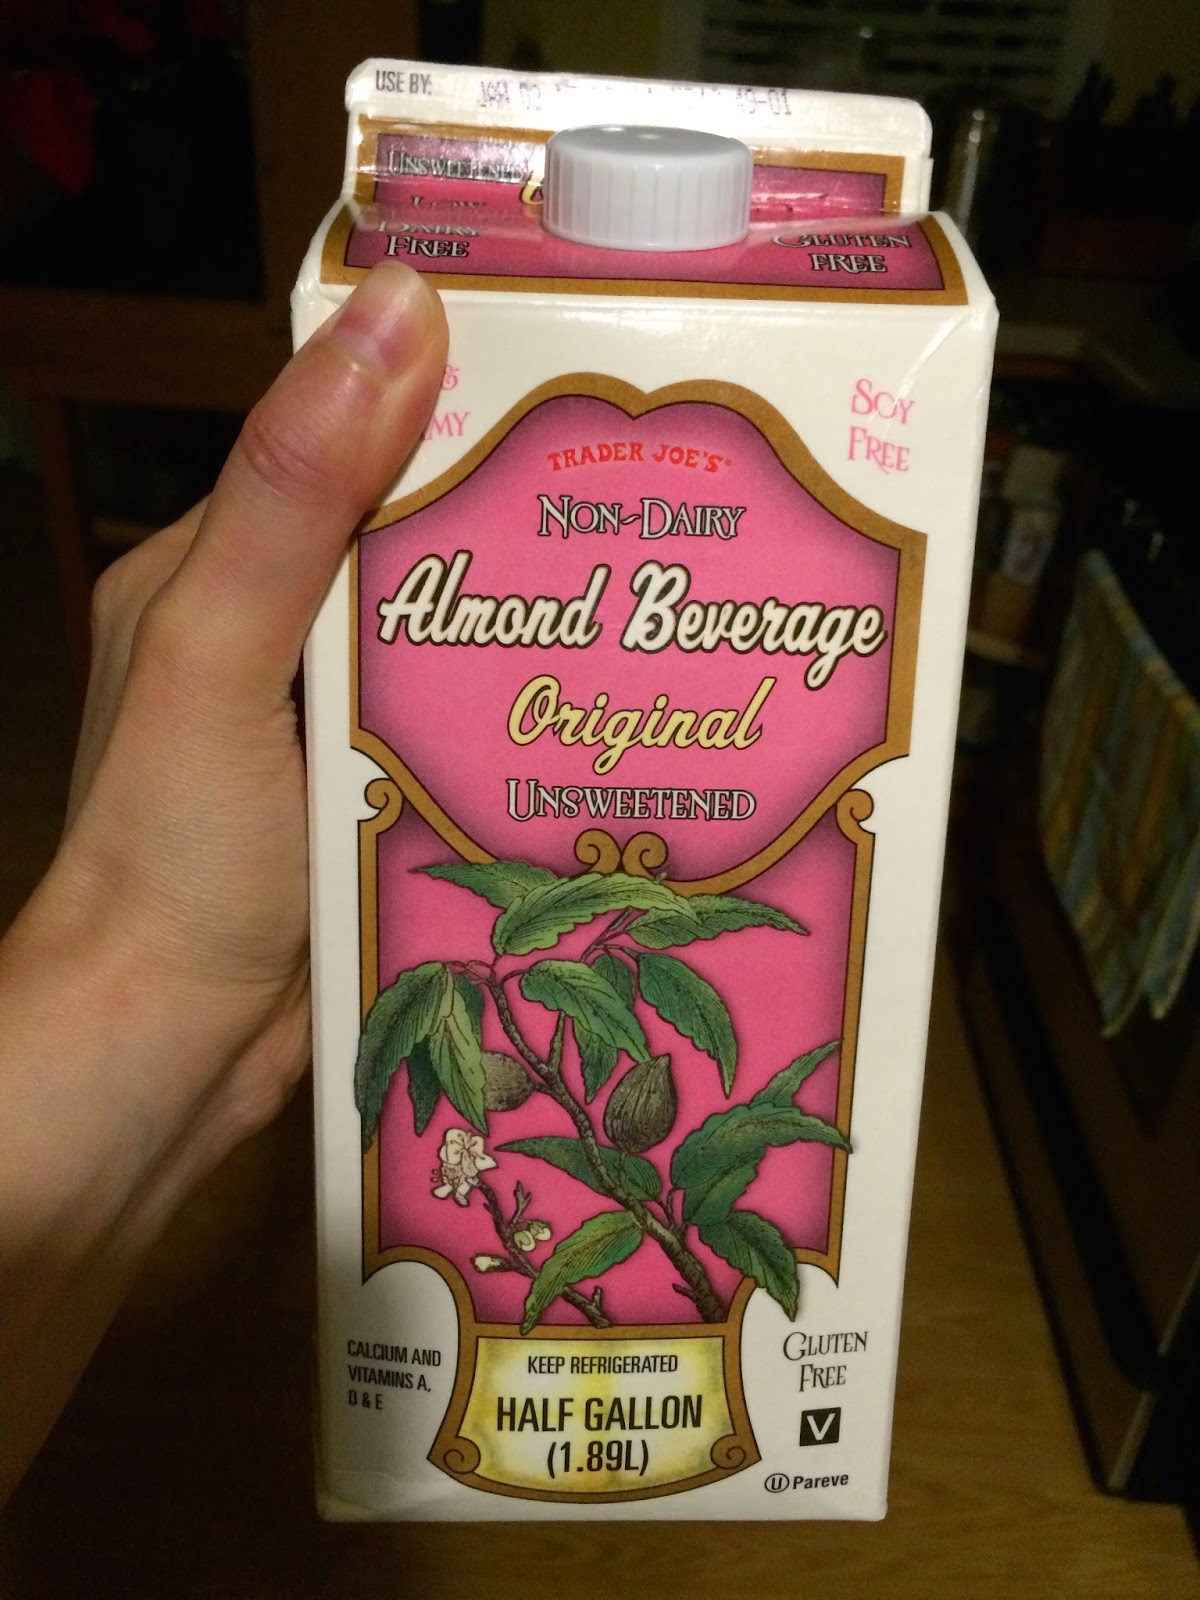
  • 1 2/3 cups of warm (110 degree) Trader Joe's unsweetened Almond Beverage (aka Almond Milk!)
    • I like Trader Joe's Almond Beverage (found in the refrigerated section), as it doesn't have any carrageenan in it, which can cause digestive problems, and I have enough of those!
  • 1 whole large organic egg, plus Just Whites to make enough egg mixture to equal 3/4 cup (2 Tablespoons plus 2 teaspoons Just Whites and 6 Tablespoons warm water)
    • I started buying Just Whites, as it doesn't have any preservatives or other scary ingredients like liquid egg whites, and I got sick of throwing away egg yolks in recipes that need extra whites
  • 1/4 cup (4 Tablespoons) melted organic cultured, unsalted butter
  • 1 teaspoon Bragg's Organic Apple Cider Vinegar
    • This is the best vinegar.  It's unpasteurized and is the real deal!

First, I warmed up the almond milk to 110 degrees and then added the yeast packet and let sit for five minutes, while I got everything else together.  In a small bowl, I mixed together the warm water and Just Whites with a small whisk until it was all dissolved.  Next, I melted the butter.  After the yeast sat for five minutes, I added the flour mixture, yeast/milk mixture, one beaten egg, egg whites, melted butter and cider vinegar to the bowl of my Kitchen Aid mixture.  I mixed it for three minutes on a medium speed, stopping twice to scrape the sides with a rubber scraper.

I oiled up my USA Pans loaf pan (love these pans, if you haven't tried them yet) with cooking spray and added in the dough mixture.  I sprayed a piece of foil with oil and then put the loaf pan in my dehydrator at 80 degrees for half an hour.  This is an extra and unusual step, but it helps keep the dough nice and warm and helped it to rise considerably over the top of the pan.

I put the pan in a 375 oven uncovered for the first 10 minutes.  After 10 minutes, I used the same oiled piece of foil I used in the dehydrator to cover it in the oven and baked for 50 more minutes.

When I took it out of the over after an hour of total time, the crust had turned a golden brown and was nice and crusty when I tapped it with my finger.  As you can see, it looked great when I took it out of the oven.  Nice and puffy loaf with a crusty outside.

After waiting a very long 20 minutes to let it cool on a wire rack, the bread sliced up like a dream!

This is the best gluten-free bread I've had in a LONG time.  My husband agreed that it was excellent, and I will no longer fear making GF bread with this Bob's Red Mill mix in my pantry!