Search This Blog

Thursday, July 14, 2011

Cabbage Casserole

Last week, we received a small head of cabbage in our CSA box.  I've never purchased a whole cabbage before.  I've purchased salad mixes with cabbage, or pre-shredded cabbage, so I wasn't sure what I wanted to do with a whole cabbage head.  I decided to look around at some recipes, and I came up with this hybrid cabbage casserole.  Both my husband and I really liked it.  In fact, my husband commented a few times about how much he liked it, even a day after we had eaten it.  I received another head of cabbage in this week's produce box, and I think I'm going to make this again!

1 small head of cabbage, cut into small pieces and cored
1 cup of chopped onions
1 tablespoon butter
1 1/2 cup of milk (I used unsweetened almond milk)
4 tablespoons goat cheese
4 eggs, beaten
1/3 cup bread crumbs (I used rice bread crumbs)
1 tsp dried basil
1 tsp garlic powder
Dried oregano
Parmesan cheese
Salt to taste

Pre-heat oven to 350.

Melt butter in large frying pan over medium heat.  Add in cabbage and onion, and cook for about 10-15 minutes, stirring frequently, until softened.  Meanwhile, beat 4 eggs in a small bowl.

Add in milk and cheese.  Cook for approximately another 5 minutes, until milk starts to boil.  Slowly add the beaten eggs to the vegetable and milk mixture, stirring as you pour in the egg.  Add in bread crumbs, basil, salt and garlic powder.  Cook for another 5 minutes.

Put mixture into a small casserole dish.  Sprinkle top with dried oregano, parmesan cheese and a few tablespoons of bread crumbs.  Put into oven and bake for about 15-20 minutes, until bread crumbs on top begin to brown.

Friday, July 8, 2011

Mini Muffin Meatloaves

I've had a photocopy of this recipe for years.  I think it was from Cooking Light magazine, but I'm not entirely sure where it came from.  It's a really simple but tasty recipe.  Having the meatloaf already divided into pre-measured portions makes it easier to serve, and makes for a nice presentation.  It's also easy to freeze any leftover meatloaf muffins.

Serves 8| Total Time: 40m

1 ½ lbs lean ground beef, turkey and/or pork
1 large egg, beaten
¼ cup quick-cooking oatmeal
2-4 tsp dried parsley
¼ cup ketchup, divided
3 Tbsp milk
1 small onion, chopped (3/4 cup)
¼ tsp salt
1/8 tsp pepper
2 tsp Worcestershire sauce

1. Preheat oven to 375. Coat muffin pan with cooking spray.

2. Mix meat, egg, oatmeal, parsley, 2 tbsp ketchup, milk, onion, salt & pepper in a large bowl.

3. Form the mixture into 8 balls & place in prepared muffin cups.

4. Combine 2 Tbsp of ketchup & Worcestershire sauce & spread ½ tsp over each mini meatloaf.

5. Bake the meatloaves until their internal temp reaches 160 degrees, about 25-30 minutes.

Wednesday, July 6, 2011

Keeping Your Drains Clear & Garbage Disposal Happy

This may be something you rarely think about (or ever think about), until your drain is clogged!  There are a few simple things you can do every few months to keep your drains clear and smelling fresh, without have to resort to nasty, chemical drain cleaners.  This will also help prevent you from having to call a plumber, which saves money and time!

All you need are a few simple ingredients:

  • White vinegar (I get the big jugs of Heinz white vinegar at Costco)
  • Baking soda (I also get this at Costco.  They sell big bags of Arm & Hammer)
  • Ice
  • Citrus rinds (lemons, limes, oranges, etc.)

First, to clean your drains:

  1. Fill a large, microwave-safe liquid measuring cup with white vinegar (I use my big 4-cup Pyrex glass measuring cup)
  2. Heat in microwave for 2-3 minutes, until hot
  3. Pour about 1/2 cup of baking soda into the drain of your sink
  4. Now comes the fun part (almost like a science experiment) - pour the hot vinegar into the sink.  It will fizz up like crazy.  Continue to pour vinegar until all the baking soda is dissolved and flushed down the sink.
  5. Don't use your sink for at least half an hour.  You will hear fizzing continue in the sink pipe, as the baking soda and vinegar mix go to work.
  6. Boil a tea kettle of water on the stove
  7. Pour the boiling water down the drain to flush everything out
Now your drain is all cleaned out.  Doing this on a regular basis will help to keep pipes clean and get rid of any grease or soap residue building up in the pipes.

Now, onto your disposal:

  1. Put a handful of ice cubes into your disposal (without it running!)
  2. Add some citrus rinds (you can also store citrus rinds in your freezer in a freezer bag and then take them out as needed)
  3. Turn on your disposal.  It will sound horrible as it grinds up the ice, but don't worry.  The ice is cleaning off the blades and the citrus helps to cut through grease and make the sink smell fresh.
Enjoy your clean, fresh smelling sink!

Monday, July 4, 2011

Gluten-Free Living: Making the Transition

Over the last year, through a lot of trial and error and allergy elimination diets, I've realized I have a real problem with gluten.  To be blunt, it makes me feel like crap.  I didn't realize this until after I cut out gluten and then added it back in, that it made me feel so horrible.  I had been living for years feeling horrible all the time, and not even realizing this wasn't normal!

Recently, it seems like a lot more people are finding that they may not have full-blown celiac disease, but a gluten sensitivity.  It may make you feel sluggish, have stomach pain, gas, headaches, or spend half your day in the bathroom.  Making a switch over to a gluten-free lifestyle really hasn't been that difficult for me.  Here are my top tips for making a transition to gluten-free diet:
  1. Become familiar with ingredients that contain gluten. These would include wheat (bulgur, semolina, farro, durum), barley, kamut, spelt, rye, and triticale.
  2. Get rid of any gluten-containing products from your cupboard.  This would be mostly your prepared, packaged foods, such as crackers, cereals, snack bars, breads, bread crumbs, couscous, pasta, flour, cookies, etc.  Keep in mind that many prepared sauces and soups may also have wheat flour in them as a thickener, so be on the lookout for that.  Beer is also commonly made with grains containing gluten, so you may want to stay away from beer, or keep an eye on how it makes you feel if you're only gluten sensitive.
  3. When you eat out, stay away from the bread basket, ask for salads without croutons, and order entrees without breading or pasta.  
  4. If you go out for ice cream, get it in a dish instead of a cone.
  5. Add in new grains to your diet that are gluten-free.  The good news is that there are more grains that are gluten-free than there are ones that contain gluten.  You can choose from amaranth, buckwheat, corn, millet, quinoa, rice, teff and tapioca. 
  6. Find out if oats are okay for you.  Oats are on a questionable list for some people, as they can sometimes be contaminated with gluten.  I've found I'm okay with oats, but I don't believe I have celiac disease, just a gluten sensitivity.  You can now find gluten-free oats from some companies, including Bob's Red Mill.  If you're concerned about oats and still want to eat them, look for ones specifically marked as gluten-free.
  7. Re-stock your pantry with gluten-free substitutes.  Here are my favorite replacements:
  • Breads: Udi's Gluten Free breads, soft corn tortillas
  • Crackers: Blue Diamond Almond Thins.  I order them by the case from Amazon.  Any type of rice cracker is safe, too.  We also have corn chips and popping corn around the house if we want a crunchy snack.
  • Cereals: I don't eat boxed cereal anymore.  I tend to make oatmeal or quinoa cereal.
  • Snack bars: LARABAR and KIND Bars (my favorite KIND Bars are the Almond Apricot flavor)
  • Bread crumbs: I often use oats in place of bread crumbs, or I make my own bread crumbs out of gluten-free bread.
  • Pasta: Brown rice pasta and buckwheat pasta.  If you have a Trader Joe's or Whole Foods near you, they carry a good selection of rice pastas.  Spaghetti squash is also very good.
  • A few of my favorite gluten-free grain replacements to eat with meals are quinoa, brown rice or polenta.
  • If you want to continue to bake, stock up your pantry with wheat flour replacements: rice flour, oat flour, arrowroot, potato flour and garbanzo flour are common.  You'll also want to get some xanthan gum to add back the elasticity that will be missing from baked goods without the gluten.
Check out my favorite online resources for recipes and cooking ideas:
Suppliers of gluten-free products:
More and more companies are making gluten-free alternatives, and the availability of more gluten-free grains in stores is becoming increasingly common.

If you have any other questions or suggestions about gluten-free living, please pass them along.  I know more and more people who are cutting gluten out of their diet due to heath reasons, so I'd love to share as much info with everyone as possible!

Sunday, July 3, 2011

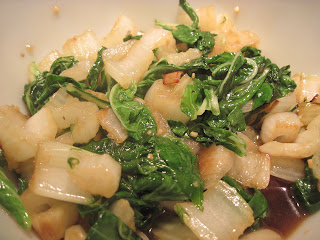
Asian Bok Choy

Another new vegetable to me - bok choy! We received a whole head of it in our CSA share this week. My husband wanted sushi the other night, so I thought doing some sort of Asian-themed recipe with the bok choy would be a nice pairing.

1 pound bok choy
1 tablespoon coconut oil
1 tablespoon sesame oil
1/4 cup water
1/2 teaspoon powdered ginger
2 cloves garlic, minced
1 tablespoon oyster sauce
1 tablespoon light soy sauce
1 tablespoon honey

Trim off the ends of the bok choy and chop, keeping the white parts separate from the green as they will need to cook longer. Rinse and spin or pat dry. Set aside.


Heat the sesame and coconut oils in a large skillet or wok over medium-high heat. 

In a medium bowl, stir together the water, ginger, garlic, oyster sauce, soy sauce and honey. Set this aside.

Add the bok choy stems first; stir fry for a few minutes or until the pieces start to turn a pale green. When stems are almost cooked, add the leaves; cook and stir until leaves are wilted, 1 to 2 minutes. Remove from the heat and transfer the bok choy to a serving dish. 

Pour the sauce into the skillet or wok (watch out for splattering and steam when you add the sauce to the hot pan), and set over medium-high heat. Cook, stirring constantly, until sauce has thickened slightly, about 2 minutes. Pour over the bok choy and toss lightly to coat.

Sauteed Turnips and Baby Portobellos

I've never cooked turnips before, let alone turnip greens.  This week, we received a huge bunch of turnips in our CSA box from Jack's Farm.  I had no idea what to do with them.  After doing some research online, I found you can cook and eat turnip greens just as you would spinach.  Looking around at what I had available, I came up with the following recipe:

1 large bunch white turnips with greens
1 small container baby portobello mushrooms
3 green onions (scallions)
1 teaspoon rosemary
2 tablespoons butter
Sea salt

Wash turnips and greens, then peel turnips and cut off root end.  Cut off greens and set them aside.  Cut turnips into small pieces (for some of the larger ones, I quartered them, others I just cut in half).  Cut up three green onions.

Heat up a frying pan with 1 tablespoon butter.  Add turnips and green onions and cook for about 8-10 minutes, turning occasionally, until the turnips begin to turn golden brown.  While the turnips are cooking, break the stems off the washed greens and cut up the mushrooms into slices.

Add the cut mushrooms and rosemary, along with 1 more tablespoon butter.  Cook for about 5 more minutes.

Add in the turnip greens and cook until the greens are wilted.  Sprinkle with sea salt.

Serves 2-3 as a side dish

Friday, July 1, 2011

Salmon Cakes With Dill Sauce

This blog post comes from a recipe request from one of my good friends, Natalie.  After catching up over the phone the other day, she mentioned really liking salmon cakes.  I'm also a fan of salmon cakes. I've tried many recipes, but this is BY FAR my favorite one.  I told her she had to try out this recipe, so I thought I'd share it with everyone.  I don't know what it is about this particular recipe, but it makes the tastiest salmon cakes every.  I swear!  It's really easy to make, and the dill sauce is quite delicious, too.

Salmon Cakes

Serves 4-8| Hands-On Time: 15m | Total Time: 35m

3 tsp extra virgin olive oil
1 small onion, finely chopped
1 stalk celery, finely diced
15 oz canned salmon, drained (or 1 ½ cups cooked salmon)
1 large egg, lightly beaten
1 ½ tsp Dijon mustard
1 Tbsp mayo
1 cup bread crumbs (or quick oats or gluten free bread crumbs)
½ tsp ground pepper
Creamy Dill Sauce (see recipe below)

1. Preheat oven to 450. Coat baking sheet w/ cooking spray.

2. Heat 1 ½ tsp oil in a large skillet over medium-high heat. Add onion & celery; cook, stirring, until softened, about 3 mins. Stir in parsley; remove from heat.

3. Place salmon in medium bowl. Flake apart with fork. Add egg, & mustard; mix well. Add onion mixture, breadcrumbs and pepper; mix well. Shape into 8 patties.

4. Heat 1 ½ tsp oil in pan over medium heat. Add 4 patties and cook until underside is golden, 2-3 mins. Turn over patties onto prepared baking sheet. Repeat with remaining 4 patties

5. Bake cakes until golden on top and heated through, 15-20 mins. Meanwhile, prepare Creamy Dill Sauce:

Creamy Dill Sauce 

¼ cup reduced fat mayo
¼ cup nonfat plain yogurt
2 scallions, thinly sliced
1 Tbsp lemon juice
1 Tbsp finely chopped fresh dill
Freshly ground pepper, to taste

Combine all above ingredients in a small bowl and mix well.